


These looooooong final summer days need to be filled somehow. We’ve gone everywhere fun I can think of. My son has spent so may hours swimming there’s always a load of bathing suits in the laundry room. We’ve made lots of snacktivities. There is almost nothing we haven’t done yet to pass the time and yet his school doesn’t start for another couple weeks. I’m going to lose my mind. So I decided to try out this crayon melting activity my son’s preschool did this past year. I’d been meaning to do it for months anyway when we finally gave it a shot, and you know what? It was awesome! Plus it’s a great way to reuse crayons you might otherwise throw out.
Here’s a step-by-step guide:
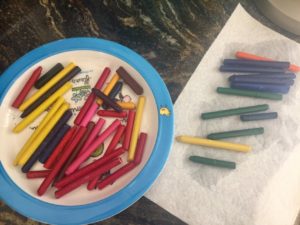
My son keeps a giant tin of all his crayons, and inevitably, many of them break. Every time we eat at a kid-friendly restaurant we end up with the crayons that come from the kids meal. Those eventually make their way into the tin. So, this is all to say, we’ve collected a lot of crayons that go unused. I also like the idea of upcycling these extra and broken crayons into different shapes because it saves them from landfill and they’ll be easier for my son to grip. He is left-handed and has fine motor challenges as a result, so he’s still not entirely adept at using a tripod grip.
The first thing we did was identify which crayon colors were duplicates. I made sure to save at least one of each color in case this whole experiment went south and we lost the whole batch. That still left us with a lot of extra and broken crayons to work with. I even snuck in a bit of early math here as I asked my son to group them by color and count which group had the most pieces.
Next we peeled the paper off. My son was enormously patient with this step, though I did have to help him start some of the peeling as the paper sometimes stuck to the wax. We also noticed that some glue remained on the crayons, so I rinsed them off under water to remove the last remnants.
FYI: There have been reports that some lower quality crayons contain asbestos which is cancer-causing. Read about it here. For that reason, I chose to only use Crayola crayons. I also noticed that when I accidentally rinsed a non-Crayola crayon in water the color came off on my fingers, which I worried would affect the dye when melted. My point is: always stick with good quality crayons both for aesthetics and your family’s health!
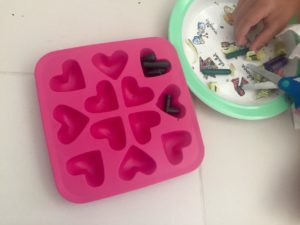
Now the super fun part, my son took the lead in filling the trays with the broken crayons. We found these molds at Ikea where they were $1/each! I didn’t want to use my regular baking molds since the wax would be impossible to get out afterwards. These are technically ice cube trays, but can withstand low heat in the oven so were perfect. They also come in cute ergonomic shapes like hearts and florets!
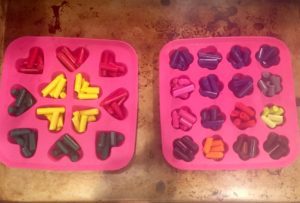
Once the molds were filled with crayons, they went into a 250 degree oven for about 10-15 minutes.
NOTE: Fill each section with more wax than you think it’ll need. When they melt down the air pockets between pieces will fill in. I actually went back after about 8 minutes and added more crayons to some wells to fill them up to the top.
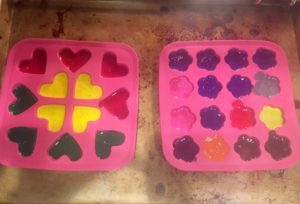
Tada! Once all the crayons had melted to a liquid consistency I carefully removed them from the oven. Having the molds on a large baking tray helped keep them steady and avoid spilling.
Let the molds cool until the wax hardens. This took about half an hour I think. They were pretty easy to pop out, and I’m proud to report that none broke in the process!
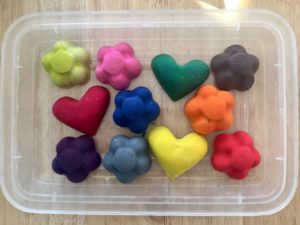
The final product. Super fun activity to do with your child, and also a great way to upcycle your extra and broken crayons!


